Kaseya Intelligence
 Security and navigation
PERMISSIONS Security level with Admin Feature Access permission to Kaseya Intelligence.
NAVIGATION Left Navigation Menu > Admin > Admin Categories > Automation > Kaseya Intelligence
IMPORTANT Kaseya Intelligence features are included with a Kaseya 365 Ops, ITSM +, and Ultimate Autotask subscriptions. Refer to Upgrading to ultimate for more information.
BEFORE YOU BEGIN This feature may be hidden in your Autotask instance because it is not activated. If so, you can activate it on the Left Navigation Menu > Admin > Admin Categories > Activations page. Refer to Activations.
Kaseya Intelligence for Autotask introduces AI-powered tools—Smart Ticket Summary, Smart Writing Assistant, Smart Resolution Summary, and Ticket Triage—to streamline documentation, enhance communication, and improve ticket triaging for greater team efficiency.
Smart Summaries
IMPORTANT Selecting a form template is the equivalent of manually populating the form. Form template settings will override any previously populated field content, including notification settings, additional contacts, and secondary resources.
To enable or disable Kaseya Intelligence smart summary settings:
-
Navigate to Left Navigation Menu > Admin > Admin Categories > Automation > Kaseya Intelligence > Kaseya Intelligence Settings.
-
Toggle the Enable Kaseya Intelligence button.
-
Select the Smart Summaries tab.
-
Select the checkbox next to the setting(s) you wish to enable or disable.
-
Click Save Changes.
Smart Ticket Summary
With Kaseya Intelligence:
-
Succinct, AI-powered analysis of an Autotask ticket surfaces key details, actions taken, and next steps. A 1-click solution to getting your team up-to-speed on ticket information.
Improve your Smart Ticket Summaries:
-
Smart Ticket Summaries use key ticket information in order to provide quick, up-to-date information to help you get informed about an ongoing ticket. To improve the accuracy and consistency of this information, be sure you and your team provide key information in the Description, Ticket Notes and Time Entries. Internal Notes will not be utilized for these Ticket Summaries.
Additionally, be sure to include key ticket information such as the following:
-
Issue-Type
-
Sub-Issue Type
-
Any devices related to or impacted by the issue
With limited information available, a Smart Ticket Summary will be restricted on its ability to provide information:
-
"I checked all 79 AP are online and rebooted the closet AP and confirmed with Sandy that there were no more issues."
With additional information added to the ticket as described above, Smart Ticket Summary can become far more useful to your team:
-
"Tristan verified that all 79 Access Points (APs) at the Dover office are online. He rebooted the closet AP and confirmed with Sandy that the issue has been resolved. No further action is required at this time."
Smart Resolution Summary
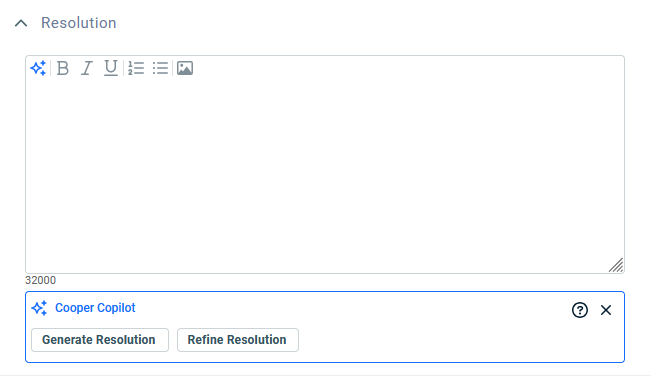
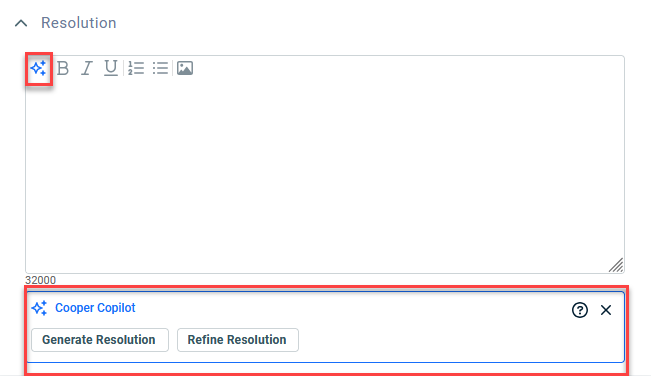
Smart Resolution Summary is available in the Resolution field when editing a Ticket. To show or hide the available options, click the  icon. The Resolution field’s visibility is controlled by your Ticket Category. Refer to The General tab.
Generate Resolution
-
From an existing ticket, click the Edit button and navigate to the Resolution field.
-
Click Generate Resolution to create a new Resolution summary from the Ticket information, Notes, and Time Entries.
-
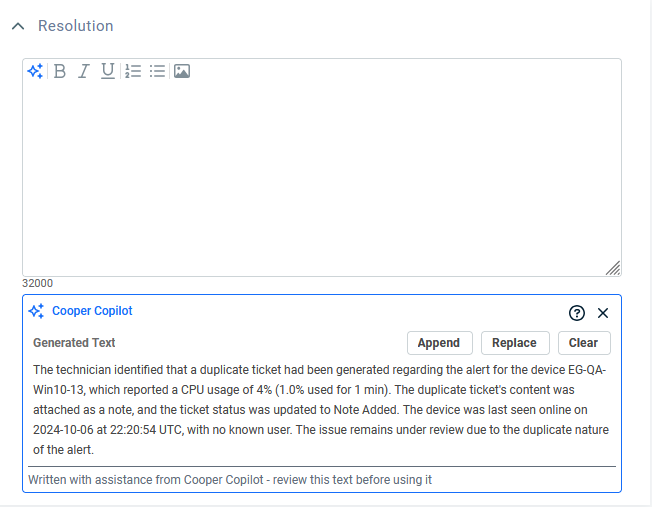
Click Append to add the generated text to the Resolution field or Replace to replace any existing text.
-
Click Save to confirm all changes.
Refine Resolution
-
From an existing ticket, click the Edit button and navigate to the Resolution field.
-
Click Refine Resolution to take the information from within the Resolution field and provide a summarized and refined version of this information.
-
Click Append to add the generated text to the Resolution field or Replace to replace any existing text.
-
Click Save to confirm all changes.
Smart Writing Assistant
Where is Smart Writing Assistant visible?
Smart Writing Assistant is available when creating or editing a Ticket Note, Time Entry. To show or hide the available options, click theicon.
Summarize Notes
-
From an open ticket, click New Time Entry or New Note.
-
Add your notes in the Summary Notes or Description and complete all other required fields.
-
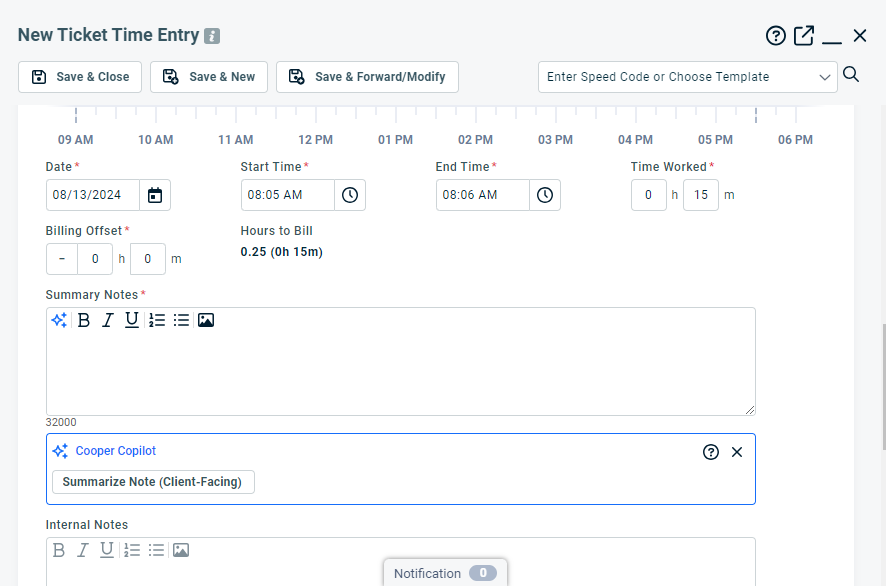
Click Summarize Notes (Client-Facing).
-
Select if you want to Append or Replace your current notes with the new Smart Writing Assistant text.
-
Click Save & Close to confirm all changes.
Languages
Kaseya Intelligence supports generating content in multiple languages.
To set a Default Language:
-
Navigate to Left Navigation Menu > Admin > Admin Categories > Automation > Kaseya Intelligence > Kaseya Intelligence Settings.
-
In the Languages section, select a language from the Default Language drop-down list.

-
Click Save Changes.
NOTE Only one Default Language can be selected at a time. This Default Language applies to all Kaseya Intelligence generated content, unless the user specifies another language.
Other Available Languages
To enable or disable other supported languages, check the boxes next to the desired languages. When multiple languages are selected, they will be available alongside the default language.
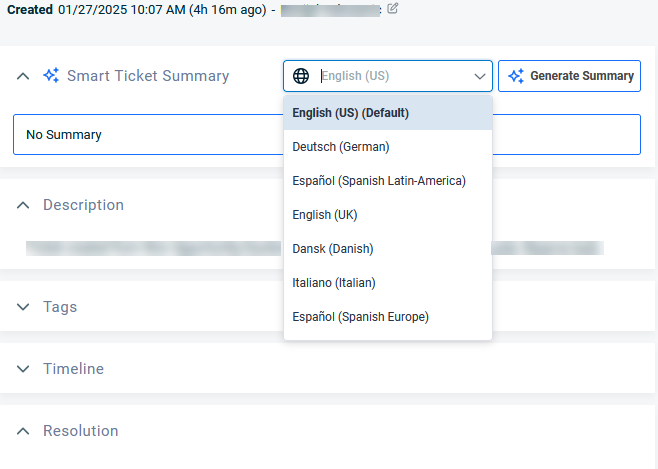
Supported Languages:
-
Arabic
-
Chinese (Simplified)
-
Chinese (Traditional)
-
Croatian
-
Danish
-
Dutch (Belgium)
-
Dutch (Netherlands)
-
English (UK)
-
English (US)
-
Spanish (Spain)
-
Spanish (Latin-America)
-
Faroese
-
Filipino
-
French (Canada)
-
French (France)
-
Greek
-
Hebrew
-
Hindi
-
Hungarian
-
Icelandic
-
Italiano (Italian)
-
Japanese
-
Korean
-
Latvian
-
Macedonian
-
Malay
-
Maltese
-
Māori
-
Norsk (Norwegian Bokmål)
-
Polish
-
Portuguese (Brazil)
-
Portuguese (Portugal)
-
Suomi (Finnish)
-
Svenska (Swedish)
-
Swedish
-
Thai
NOTE The default language is not available for selection.
Ticket Triage
Ticket Triage is part of Kaseya Intelligence for Autotask. It uses AI and association algorithms to streamline ticket management by identifying missing or inconsistent information, suggesting ticket field values, and assisting with ticket assignment. Ticket Triage analyzes a subset of your historical tickets to make suggestions on future tickets, using only the ticket data from the ticket’s organization.
Ticket Triage includes the following configuration areas:
- Ticket Data Analysis
- Assignment Eligibility
- Triage Actions (Workflow Rules)
NOTE Ticket Triage suggestions and assignments are controlled by Workflow Rules and your Ticket Triage configuration. Refer to Triage Actions (Workflow Rules).
Configure Ticket Triage
IMPORTANT To prepare your Autotask environments for Ticket Triage and to improve results, refer to Data maturity assessment before configuring any settings.
You configure Ticket Triage from the Ticket Triage tab on the Kaseya Intelligence page, and by creating Workflow Rules that use Ticket Triage actions.
Open Ticket Triage settings
- Navigate to Left Navigation Menu > Admin > Admin Categories > Automation > Kaseya Intelligence.
- Click the Ticket Triage tab.
The Ticket Triage tab is divided into the following sections:
- Ticket Data Analysis
- Assignment Eligibility
- Triage Actions
Data maturity assessment
Use this guide to prepare your Autotask data and enable Ticket Triage so that the AI can accurately prioritize, categorize, and assign tickets from day one.
What this quick start guide covers
- A brief description of how Ticket Triage works.
- A step-by-step guide to prepare your Autotask data.
- A setup guide to deploy Ticket Triage on release day.
How Ticket Triage works
Ticket Triage uses Kaseya's Agentic AI engine to extract and understand context from your tickets. It analyzes ticket content and historical Autotask data to automate:
- Prioritization
- Field categorization
- Assignment to queues and resources
The AI engine interprets context from:
- Existing ticket history (titles, descriptions, and notes)
- Queue and priority descriptions
- Skills and skill descriptions
- Issue and Sub-Issue Types
Once data is analyzed, Ticket Triage can auto-apply or suggest values for these fields:
- Priority
- Issue Type
- Sub-Issue Type
- Queue
- Primary Resource
Future releases will expand this field set to include additional ticket fields, including User Defined Fields (UDFs).
NOTE Ticket Triage does not understand intent like a human. It recognizes patterns. Clear, consistent data creates clear patterns and better AI results.
Part 1 - Prepare your data for Ticket Triage
Complete the steps in this section before or during the Ticket Triage release to ensure your data is ready for accurate inference.
Step 1 - Add Priority descriptions (High Impact)
Add a clear, business-focused description for every active ticket priority. The AI uses these descriptions to understand business impact and urgency. Refer to Task & ticket priorities for more information.
Where to configure
- Left Navigation Menu > Admin > Features and Settings > Service Desk (Tickets) > Task and Ticket Priorities
Recommended structure / best practices
- Use the formula: Impact > Scope > Urgency > Business Consequence.
Example (Good): "For business impacting issues affecting multiple users or core business systems. Tickets under this priority require immediate service desk attention and response to prevent client operational disruptions."
Example to avoid: "High priority issues" | "Critical items from VIP"
Why this matters: The AI prioritization agent reads your priority descriptions as operational policy. Clear descriptions remove guesswork and align the AI with your business rules.
Step 2 - Add or refine queue descriptions (High Impact)
Ensure every active Queue has a description that clearly states what belongs in the queue and what does not. Refer to Service Desk queues for more information.
Where to configure
- Left Navigation Menu > Admin > Service Desk (Tickets) > Queues
Recommended structure / best practices
- Use the formula: Work Type > Inclusions > Explicit Exclusions.
Example (Good): "Handles Tier-1 end-user incidents related to workstation issues, login problems, and standard application access. Excludes server, network, and security incidents."
Example to avoid: "General Support"
Why this matters: The assignment agent compares queue descriptions with ticket content to find the best routing. Vague or generic queues lead directly to misrouted tickets.
Step 3 - Improve Issue and Sub-Issue type naming
Review all Issue and Sub-Issue types to ensure the names themselves clearly indicate the type of work or problem. Long descriptions are not required; clarity in naming is. Refer to Adding issue types and sub-issue types for more information.
Where to configure
- Left Navigation Menu > Admin > Features and Settings > Service Desk (Tickets) > Issue and Sub-Issue Types
Recommended structure / best practices
- Use clear, specific, outcome-oriented names.
- Avoid ambiguous or duplicate meanings.
- Ensure Sub-Issue types further refine the parent Issue Type.
Example (Good): Issue Type: "Email Delivery and Access" | Sub-Issue: "M365 Mailbox Authentication Failures"
Example to avoid: Issue Type: "Email" | Sub-Issue: "Problem"
Why this matters: The categorization agent uses Issue and Sub-Issue types as semantic anchors. Clear naming makes it easier for the AI to map ticket language to the correct problem category.
Step 4 - Review your Skills library (Required Dependency)
If you use Skills in Autotask, review and clean up your skills before enabling Ticket Triage. Refer to Managing certificates, degrees, and skills for more information.
If you do not currently use skills, or your skills are outdated and unused, you can skip this step for now. You will activate the new system skills on release day.
Where to configure
- Left Navigation Menu > Admin > Features and Settings > Company Settings and Users > Resources/Users (HR) > Skills Management > Skills
Recommended structure / best practices
- Identify and remove duplicate skills.
- Add descriptions that clearly describe the technology and task capability.
- Use the formula: Technology > Task Capability > Context.
Example (Good): "Troubleshooting Microsoft 365 mailbox access, authentication, and mail flow issues."
Example to avoid: "Email support"
Why this matters: The Skill Matching agent infers required skills from tickets and maps them to resources. Duplicate or vague skills introduce ambiguity and reduce assignment accuracy.
Part 2 - What to do on release day
On the day Ticket Triage is released to your environment, complete these steps to enable and control the automation.
Step 1 - Activate the new System Skills
System skills will be ACTIVE by default. In order to assign tickets based on skills, the AI engine needs a library of skills with descriptions that provide good context. To help you, Autotask includes a curated library of more than 240 system-provided skills, researched and aligned with ITIL, ITSM, and MSP best practices.
If you have your own set of custom skills, you may use them alongside system skills and you have the option to deactivate system skills in bulk, by category, or individually.
Where
- Left Navigation Menu > Admin > Features and Settings > Company Settings and Users > Resources/Users (HR) > Skills Management > Skills
On release day, you can:
- Review the system skills library.
- Deactivate system skills individually.
- Deactivate system skills by category.
- Deactivate system skills in bulk if desired.
Recommended approach
- If you have no existing skills, keep the system skills library active and use it as your starting point.
- If you already have skills, review them first and remove or consolidate duplicates before deciding whether to deactivate any system skills.
What not to do
- Avoid creating or keeping duplicate skills that overlap with system skills.
- Avoid leaving vague skills without clear descriptions, as they reduce assignment accuracy.
Why this matters: The Skill Matching agent infers required skills from tickets and maps them to resources. A clean, well-structured skills library gives the AI confidence to make accurate assignment recommendations.
Step 2 - Configure Ticket Triage Settings
Enable Ticket Triage and define the data and conditions the AI will use.
Step 2.1 - Select historical tickets for analysis
Where
- Left Navigation Menu > Admin > Automation > Kaseya Intelligence > Kaseya Intelligence Settings > Ticket Triage > Ticket Data Analysis
On release day, you can:
- Select ticket statuses and queues for AI analysis.
- Limit analysis to completed or stable tickets such as Resolved or Waiting on Client.
- Focus on queues that best represent your core service desk operations.
Recommended approach
- Choose tickets that are unlikely to be changed further.
- Favor tickets with meaningful descriptions and technician notes.
- Exclude experimental, test, or low-quality data sets.
What not to do
- Do not include tickets that are constantly updated or that lack meaningful descriptions and notes.
Why this matters: The AI engine learns from the language and patterns in your historical tickets. Clean, stable tickets with good notes and accurate fields produce stronger, more reliable recommendations.
Step 2.2 - Configure workflow rules with Ticket Triage actions
Where
- Left Navigation Menu > Admin > Automation > Kaseya Intelligence > Kaseya Intelligence Settings > Ticket Triage > Triage Actions
On release day, you can:
- Create new workflow rules to identify which tickets should be triaged.
- Update existing rules to add Ticket Triage actions.
- Set confidence thresholds and choose per-field actions.
Recommended approach
- Create or update workflow rules to define events, conditions, and timing for triage.
-
In the Actions section, enable the Ticket Triage actions:
-
Set a Confidence Threshold (default is 95; you can use any value from 1 to 100).
- The confidence threshold controls when the AI will auto-apply versus suggest values for each field.
-
Choose an action per field (Primary Resource, Queue, Priority, Issue Type, Sub-Issue Type):
- None - no change for this field.
- Suggest - the best match is suggested for a user to accept or decline via the Triage Dashboard or within the ticket.
- Auto-apply - the best match is automatically applied when the confidence is at or above the threshold; otherwise, a suggestion is presented.
-
Set a Confidence Threshold (default is 95; you can use any value from 1 to 100).
What not to do
- Do not duplicate existing workflow rules that already manipulate any of the fields managed by Ticket Triage (Priority, Queue, Issue or Sub-Issue Type, Primary Resource).
Why this matters: Ticket Triage relies on workflow triggers to start automation. Using Autotask workflow rules lets you adopt AI-driven triage at your own pace while avoiding conflicting automation.
Step 3 - Select which queues and resources participate
Where
- Left Navigation Menu > Admin > Automation > Kaseya Intelligence > Kaseya Intelligence Settings > Ticket Triage > Assignment Eligibility
On release day, you can:
- Select the Queues that can receive assignments from Ticket Triage.
-
Select the Resources that can be assigned:
- By Department
- By Workgroup
- By individual resource
Recommended approach
- Limit eligibility to queues actively used by your service desk.
- Include only resources who should receive AI-driven assignments.
- For co-managed environments, group co-managed resources into a workgroup and explicitly decide whether to include them.
Co-managed environments
- Group co-managed resources into a Workgroup.
- Include that Workgroup if you want co-managed users to participate in the triage process.
- If included, they become part of the main pool of resources the system can assign to.
What not to do
- Do not include inactive queues or resources.
- Do not include co-managed resources if you do not want them receiving AI-driven assignments.
Why this matters: Assignment Eligibility defines the safe play area for the AI. Limiting eligibility to real, active service desk queues and resources prevents misdirected assignments.
Part 3 - Writing high-quality ticket content
The quality of your ticket content directly affects Ticket Triage accuracy. Use a simple writing formula for all ticket descriptions and notes:
Recommended writing formula
- Meaning > Business Intent > Desired Outcome > Exceptions.
Examples
Bad description
"Email not working."
Good description
"User cannot send outbound emails from Outlook after password reset. Error indicates authentication failure. Impacts customer communication. No workaround available."
TIP Encourage technicians to write brief but complete descriptions. A few extra seconds per ticket can dramatically improve AI recommendation quality over time.
Next Steps and Readiness Checklist
Before release day
- [ ] All active priorities have clear, business-oriented descriptions.
- [ ] All key queues have clear descriptions with inclusions and exclusions.
- [ ] Issue Types and Sub-Issue Types use clear, specific names.
- [ ] Skills library is reviewed and duplicate skills are removed (if used).
On release day
- [ ] System skills are reviewed and adjusted (kept active, or deactivated in bulk, by category, or individually as needed).
- [ ] Historical tickets for analysis are selected.
- [ ] Workflow Rules are configured with Ticket Triage actions.
- [ ] Confidence thresholds and per-field actions are defined.
- [ ] Eligible queues and resources are selected for assignment.
Once you complete these steps, your environment is ready for Ticket Triage to deliver faster, more consistent, and more scalable ticket handling with AI-driven recommendations and automation.
Ticket Data Analysis
Use the Ticket Data Analysis section to define which historical tickets Kaseya Intelligence will analyze to understand your Service Desk operations.
IMPORTANT Before configuring this section, refer to the Ticket Triage Ticket Data Analysis documentation for details on expected outcomes after the configuration is complete.
Configure Ticket Data Analysis
-
In the Ticket Status field, select up to 15 statuses that represent your
most reliable ticket data.
NOTE Include completed tickets, tickets nearing completion, or tickets that are unlikely to change further.
- In the Queues field, select up to 15 queues whose tickets you want to include in the analysis.
-
In the Ticket Category field, select up to 15 categories to include.
- By default, all categories are analyzed.
- Selecting specific categories excludes any categories that are not selected.
-
In the Analyze tickets created on or after section, select a date to have
Kaseya Intelligence analyze only tickets created on or after that date.
The page displays the active analysis window, for example: “Analyzing tickets from: March 10, 2024 to present.”
-
In the Excluded Organizations section, select any organizations you want
to exclude from triage analysis.
- Tickets from excluded organizations will not be analyzed or used for Ticket Triage suggestions.
- There is no limit to the number of organizations that can be excluded.
- Click Save.
NOTE For optimal ticket analysis results, use a date within the last 6–8 months to ensure the most accurate and relevant data set. If no date is selected, only tickets from the past 24 months will be analyzed.
Assignment Eligibility
Use the Assignment Eligibility section on the Ticket Triage tab to define which queues and resources Kaseya Intelligence can use when suggesting or auto‑assigning tickets.
ALERT Co‑Managed users may be used if they are included in your assignment eligibility selections.
Configure Assignment Eligibility
- On the Ticket Triage tab, scroll to the Assignment Eligibility section.
-
Under Queues, select the queues that will be available for Ticket
Triage suggestions or auto‑assignment.
These queues define where Kaseya Intelligence is allowed to route tickets when assigning by queue.
-
Under Resources, configure which resources may be assigned tickets by
Ticket Triage:
- Workgroups – Select the workgroups whose members will be available for assignment. Refer to Managing workgroups.
- Departments – Select the departments whose resources will be available for assignment. Refer to Departments.
- Specific Resources – Select any individual resources who will be available for assignment.
There is no limit to the number of resources you can include.
- Click Save.
Kaseya Intelligence will consider only resources and queues included in the Assignment Eligibility section when making suggestions or auto‑assigning tickets.
Triage Actions (Workflow Rules)
Ticket Triage uses Workflow Rules actions, called Triage Actions, to triage and optionally assign incoming tickets. Triage Actions define when Ticket Triage runs and which fields it can suggest or auto‑update.
Workflow rule grid
Search, filter, and sort the grid to quickly find and manage existing triage-related workflow rules as your rule set grows.
Configure Triage Actions in Workflow Rules
- Navigate to Left Navigation Menu > Admin > Admin Categories > Automation > Kaseya Intelligence > Kaseya Intelligence Settings > Ticket Triage > Triage Actions.
- Select Create. This opens the New Workflow Rule window.
-
Create the new Workflow Rule.
Define the events and conditions that will trigger Ticket Triage, such as when a ticket is created, when a specific field is changed, or when a ticket enters a particular status or queue. Refer to Adding, editing, and copying workflow rules.
- In the Actions section of the Workflow Rule, add a Ticket Triage action.
-
In the Ticket Triage action, configure the fields that Ticket
Triage can manage, such as:
- Issue Type
- Primary Resource
- Priority
- Queue
- Sub‑Issue Type
-
Configure how Ticket Triage behaves for this action:
- Suggest – Ticket Triage proposes values in the ticket UI, and users review and apply changes.
- Auto‑apply – Ticket Triage automatically updates selected fields when AI confidence is high enough, based on your thresholds.
-
Where available, set the Auto-Apply Confidence Threshold to control when
Ticket Triage is allowed to automatically update fields.
NOTE If the AI confidence is below the threshold, the action will not auto‑update fields, but can still provide suggestions for users to review.
- Save and activate the Workflow Rule.
Once configured, Ticket Triage will run according to your Workflow Rules and will surface suggestions or apply changes directly to tickets based on your settings.
Managing existing workflow rules
To view and edit existing workflow rules:
-
Navigate to Left Navigation Menu > Admin > Admin Categories > Automation > Kaseya Intelligence > Kaseya Intelligence Settings > Ticket Triage > Triage Actions.
-
Select Manage Workflow Rules. This opens the Workflow Rules page and displays all rules associated with your service desk.
-
Hover over the context menu to edit, activate/inactivate, copy, or delete a workflow rule. Refer to Adding, editing, and copying workflow rules.
NOTE The Workflow Rules page can also be accessed by navigating to Left Navigation Menu > Admin > Admin Categories > Automation > Workflow Rules > Workflow Rules.
How Ticket Triage uses workflow rules
Ticket Triage evaluates all applicable workflow rules at the time of the triggering event (for example, Ticket Created). The results of those rules are combined into a single triage operation.
Evaluation order: Auto‑apply vs Suggest
If multiple rules affect the same field, Ticket Triage resolves behavior in this order:
-
Auto‑apply
-
Suggest
-
None
That means:
-
If one rule is set to Auto‑apply a field and another rule is set to Suggest that same field, the Auto‑apply behavior wins.
-
If no rule is set to Auto‑apply for a field, but one or more rules Suggest it, the field is suggested.
Multiple workflow rules at once
-
If several workflow rules qualify for the same event and meet the ticket conditions, all of them are evaluated.
-
Ticket Triage does not run separate triages per rule. Instead, it merges the outcomes into one combined triage result.
-
Different rules can contribute different fields. For example:
-
Rule A: suggests Queue
-
Rule B: auto‑applies Resource and Priority
-
Rule C: suggests Sub‑issue
-
The final triage for that ticket can use all four fields (Queue, Resource, Priority, Sub‑issue), respecting the auto‑apply vs suggest hierarchy above.
-
-
Point‑in‑time evaluation
-
Workflow rules are evaluated for Ticket Triage only at the exact moment a ticket event occurs, such as when a ticket is created or updated.
-
Ticket Triage does not collect or pool rule results over time. Only the rules whose conditions are met at that specific event will influence the triage action for the ticket.
-
Ticket Triage evaluates workflow rules only when the ticket event occurs and does not carry their results forward to future events.
Using Ticket Triage in tickets
After Ticket Data Analysis, Assignment Eligibility, and Triage Actions are configured, Ticket Triage suggestions and assignments appear in the ticket UI according to your Workflow Rules and Ticket Category configuration.
Ticket Category requirements
- Navigate to Left Navigation Menu > Admin > Admin Categories > Features & Settings > Service Desk (Tickets) > Ticket Categories and open the Ticket Category used by the tickets you want to triage.
-
On the Main Body configuration, verify that the
Ticket Triage Suggestions component is set to Visible.
If Ticket Triage Suggestions is not set to Visible, the Ticket Triage panel and triage details will not appear.
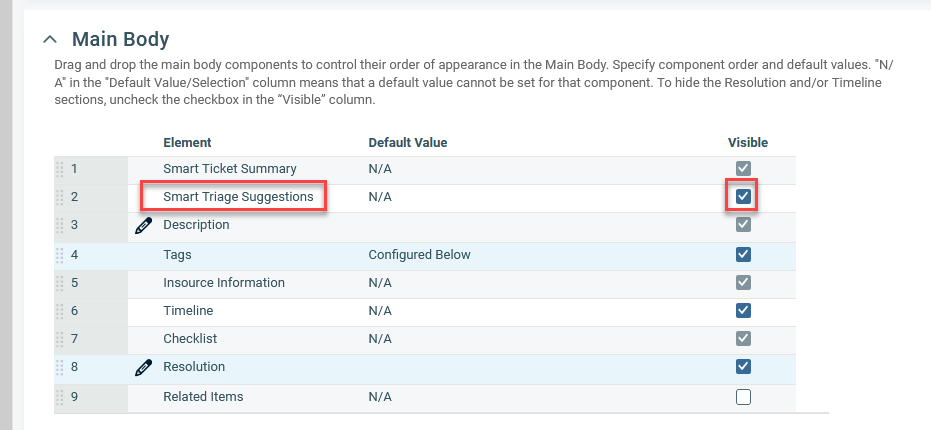
For more information, refer to Main body .
- On the Insights tab of the same Ticket Category, move the Ticket Triage insight into the Visible Insights section.
- Save & Close.
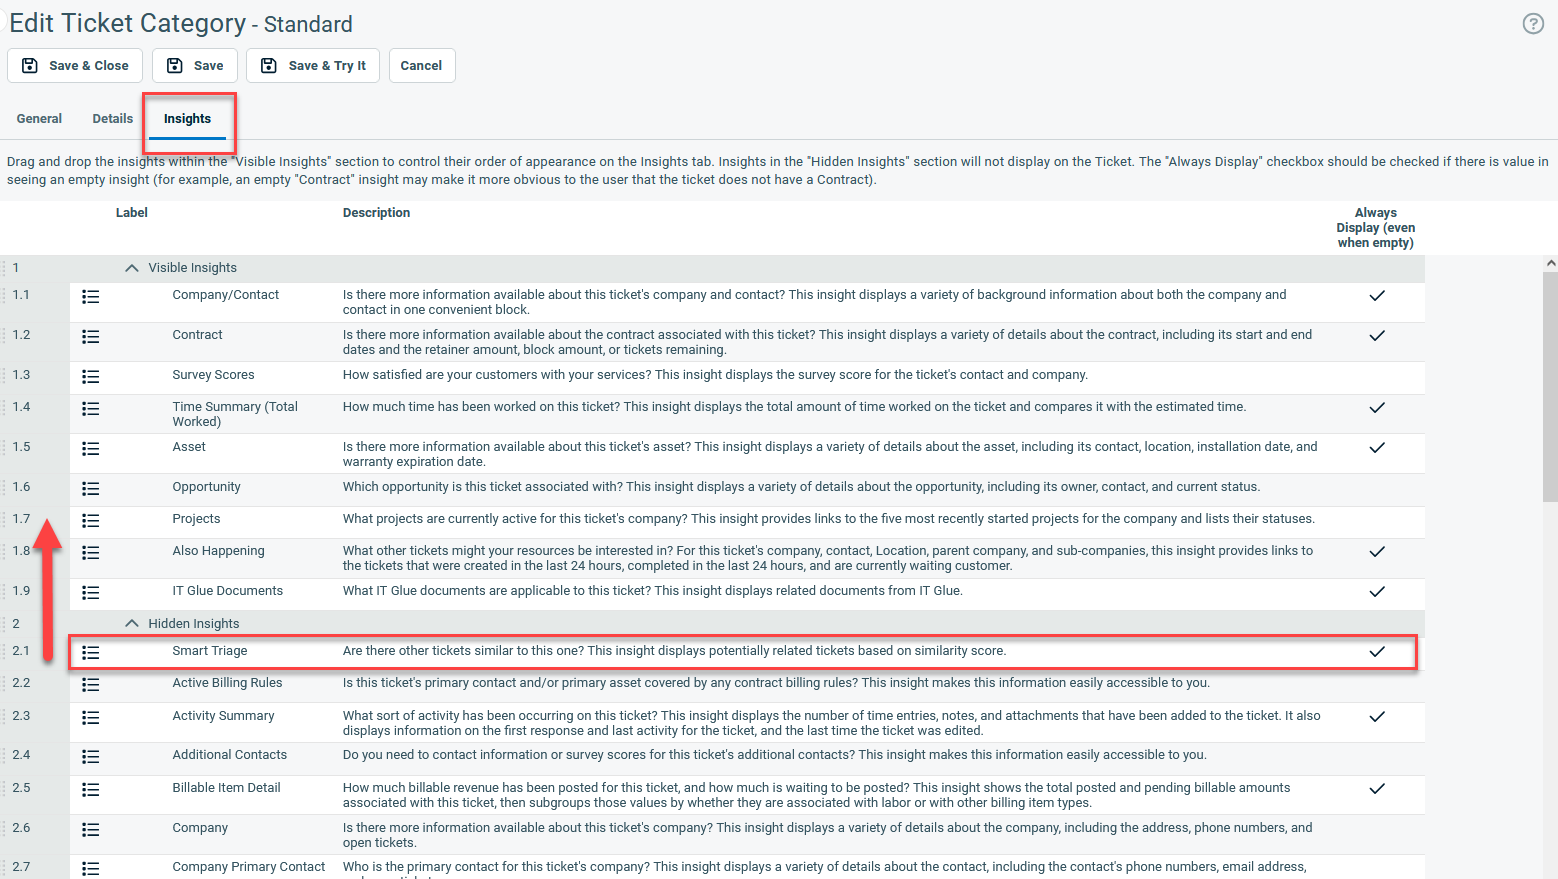
For more information, refer to Display or hide an insight for a category .
Analyze and apply Ticket Triage suggestions
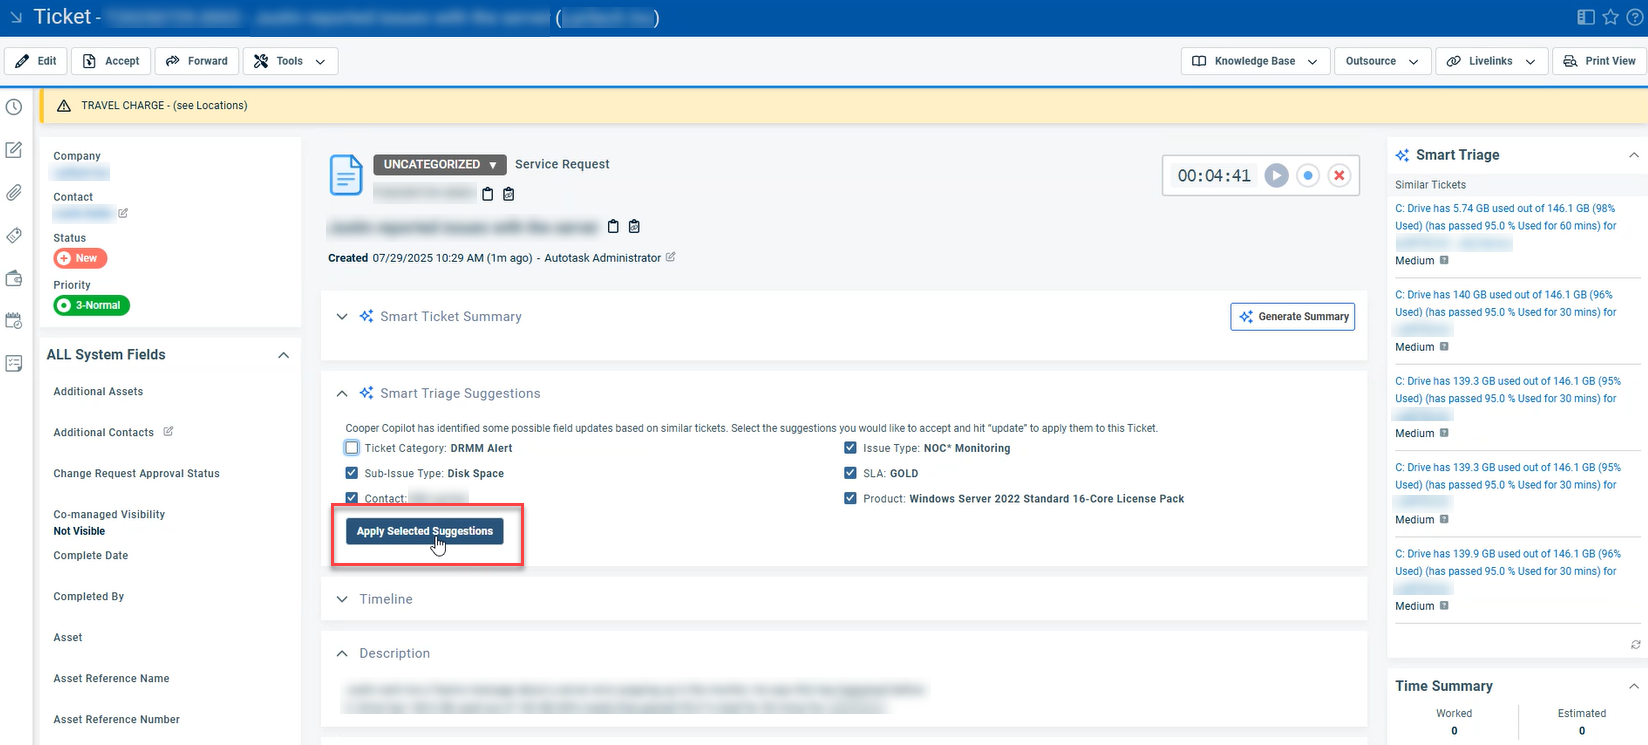
- Open a ticket that matches the conditions defined in your Ticket Triage Workflow Rule.
-
In the Triage section on the ticket, review any suggested values
for supported fields, such as:
- Priority.
- Issue Type and Sub‑Issue Type.
- Primary Resource.
- Queue.
-
If your Workflow Rules are configured for suggestions only:
- Select the suggestions you want to apply.
- Click Apply.
- The selected changes are applied to the ticket.
-
If your Workflow Rules are configured for auto‑updates:
- Review the fields that were changed by Ticket Triage and any rationale provided.
- You can manually adjust these fields if needed.
-
View the Ticket History to see what changes were applied by Ticket
Triage.
For more information, refer to Viewing the ticket history .
Why am I seeing fewer suggestions than expected?
Overview
In some cases, you may notice that the number of suggestions displayed in the Ticket Triage Suggestions section appears lower than expected. This can be confusing if you know more fields contain suggestions than what the section header indicates.
What's happening
The suggestions section header displays a count intended to summarize how many fields currently have suggestions. Under certain conditions, this count may not accurately reflect all available suggestions, even though those suggestions still exist and can be viewed. This most commonly occurs when issue type and sub‑issue type are involved.
As a result:
-
The suggestion count may appear lower than the actual number of fields with suggestions
-
The suggestions themselves are not missing—only the displayed count may be incorrect
How issue type can affect suggestion counts
In the system, a sub-issue type is treated as a child of an issue type. When a sub-issue type is set or suggested, the system infers that the issue type itself has effectively changed.
As a result:
-
A suggestion to set a sub‑issue type may implicitly represent a change to the issue type
-
Although this may appear as two separate suggestions when viewing ticket details, the system counts it as one logical suggestion
-
This can make it look like there are more suggestions visible than what the suggestion section count reflects

For example:
-
You may see five suggested fields on the ticket
-
The suggestion section header may show four suggestions
-
This happens because the issue type and sub‑issue type are evaluated together rather than as independent suggestions
How this affects the suggestion view
If you’re affected by this issue, you may notice:
-
A mismatch between the number shown in the suggestion section count and the suggestions visible when reviewing individual fields
-
The same lower‑than‑expected count reflected in related areas, such as dashboards that summarize suggestion totals
This is a display issue only and does not impact:
-
The accuracy of the suggestion data
-
The ability to review or act on suggestions
-
Saved settings or system behavior
What you should do
No action is required. We recommend continuing to review suggestions as usual, as all available suggestions are still present and accessible within the system.


