Creating a webhook
Creating a webhook enables you to subscribe to notifications for events that take place in Autotask. You can define one webhook for multiple actions, or you can build a separate webhook for each operation.
This article explains the infrastructure your environment will need for webhook support. It also guides you through the process of setting up your first webhook.
BEFORE YOU BEGIN Examples in this article may use the webservices[n].autotask.net placeholder. In such instances, substitute [n] for the zone of your user, as described in Autotask API zones and WSDL versions > Find your zone's API URL for the REST API or Autotask API zones and WSDL versions > Find your zone's WSDL file URL for SOAP API version 1.6.
Getting started
Before you can use webhooks, you'll need to ensure that the following prerequisites are met.
Your company will need to set up a web service that will receive and process any webhook callouts from Autotask. Two separate URLs are required:
- A Webhook URL to which the webhook payload will post
- A Deactivation URL that will receive a notification when a webhook deactivates or becomes deleted
Both fields are required to create the webhook.
TIP You can use a service like RequestBin.com while you are creating and testing your webhooks.
Decide how you'd like to use webhooks.
- To determine if an entity is compatible with webhooks, make a GET call and check that the SupportsWebhookCallouts attribute is True
- Companies (Accounts)
- Contacts
- Assets (Configuration Items)
- Tickets, including tickets created in Taskfire (REST only)
- Ticket Notes, including ticket notes created in Taskfire (REST only)
- In supported entities, some fields (including UDFs) can trigger a webhook or can be added to the payload, but others cannot. Use a GET call and make sure the IsSupportedWebhookField attribute is True.
- For each supported Autotask entity, four callout types are available. Each webhook consists of one or many callouts.
The following Autotask entities currently support webhooks:
We will continuously add webhook support to additional entities.
| Entity | Description |
|---|---|
|
This entity generates and defines the webhook. It is always required to build a functioning callout. For deletion and deactivation, the webhook callout is sufficient. |
|
|
This entity names the system fields that, when updated, will either trigger a webhook call, or are always included with the payload of the webhook. At least one WebhookField or one WebhookUdfField is required to make a create() or update() call. |
|
|
This entity names the user-defined fields that, when updated, will either trigger a webhook call, or are always included with the payload of the webhook. At least one WebhookField or one WebhookUdfField is required to make a create() or update() call. |
|
|
This entity names the resources for each webhook whose modifications will not generate an outbound call even if a triggering event occurs. This entity is optional. NOTE Using this functionality is useful to prevent infinite loops. If your company is using our API to integrate with a third-party application that is triggering an update in Autotask, you should not generate a webhook call back to the same application. You can prevent this from happening by excluding the API resource associated with the update. |
Creating webhooks
To create a webhook, perform the following steps. The workflows in this section of the article use the REST API and the CompanyWebhooks entity for all examples, but the steps are the same for all supported entity types.
IMPORTANT The Autotask GUI uses field labels that can be changed by customer configurations and localization. To ensure consistency for integration programming, certain SOAP entities use REST API field names instead of SOAP API labels. Refer to <EntityName>WebhookField (SOAP API) or <EntityName>WebhookFields (REST API) to learn how to interpret these names.
First, create the webhook itself by sending a POST request with a creation callout to the webhooks entity you selected in Define the webhook entity you want to use. The callout sets the name of the webhook, defines its URLs, and designates the actions that will trigger it. The request also provides the API with instructions about how to handle specific scenarios that the webhook might encounter.
In the body of the request, provide the following information. For detailed definitions of these fields, refer to <EntityName>Webhook (SOAP API) or <EntityName>Webhooks (REST API).
| Field | Definition |
|---|---|
| "IsActive" | Define whether the webhook is active (true) or inactive (false). No callouts will occur if a webhook is inactive. |
| "DeactivationUrl" | Enter the deactivation URL that the API should call when the webhook (not the entity) is deleted or inactivated. |
|
"IsSubscribedToUpdateEvents" |
Input true if this webhook should trigger as the result of entity fields updating. Enter false or leave the field blank if it should not. |
|
"Name" |
Specify the user-friendly name of the webhook as you'd like it to appear in the Autotask UI at Left Navigation Menu > Admin > Extensions & Integrations > Other Extensions & Tools > Webhooks. |
|
"SecretKey" |
Define a secret key value with which the recipient of the webhook call can confirm the legitimacy and integrity of the callout. We recommend a strong key with at least 10 digits; you can use any combination of letters, number and symbols. |
|
"SendThresholdExceededNotification" |
Indicate true if you'd like to receive notifications if the activity by the webhook exceeds API query thresholds. Otherwise, enter false. |
|
"WebhookUrl" |
Designate the webhook URL to which callouts will be posted by the API. |
|
"NotificationEmailAddress" |
Define the email address to which you'd like the webhook to deliver its notifications. |
The following example creates a webhook for the CompanyWebooks entity. The itemId value returned upon successful creation is 4.
Example creation POST URL:
https://webservices[n].autotask.net/atservicesrest/v1.0/CompanyWebhooks
Example creation request body:
{
    "IsActive": true,
    "DeactivationUrl": "https://yourDeactivationURL.net",
    "IsSubscribedToUpdateEvents": true,
    "Name": "Company Update Webhook",
    "SecretKey": "ahywqn676nwh8",
    "SendThresholdExceededNotification": false,
    "WebhookUrl": "https://yourWebhookURL.net",
    "NotificationEmailAddress": "yourNotificationemail@yourdomain_.com"
}
Successful creation response:
        {
    "itemId": 4
}
Once you've successfully created the webhook, make a note of the itemId value listed in the creation request response. You'll need it later in this workflow. Refer to the Successful creation response illustrated in the following section of this article for an example of this information.
In the following steps (2a, 2b, 3a, and 3b), you'll identify the available webhook fields to which you'd like to subscribe and define the callouts associated with them. You'll need to add separate callouts for each field where a change will trigger a callout and for each object that you want to add to the payload when another field triggers a callout.
You can have one trigger call per field. For example, if you want to call five fields, you'll need to create five trigger calls.
Before you can create callouts, you'll need to determine the fieldID values of the picklist items you'd like to use by sending a GET request to the selected webhook fields entity and reviewing the response. For each webhook you plan to create, make a note of the fieldID of the corresponding picklist value. You'll need to reference that information later in this process.
IMPORTANT You must query the webhook fields entity itself, not the parent entity, to determine the field and picklist values available to you. Refer to the following example request for more information.
The following example illustrates possible picklist values available for the CompanyWebhookFields entity. The picklist field IDs are bolded.
Example GET URL:
https://webservices[n].autotask.net/atservicesrest/v1.0/CompanyWebhookFields/entityInformation/fields
Example field information response (partial):
        {
    "name": "fieldID",
    "dataType": "integer",
    "length": 0,
    "isRequired": true,
    "isReadOnly": true,
    "isQueryable": true,
    "isReference": false,
    "referenceEntityType": "",
    "isPickList": true,
    "picklistValues": [
        {
            "value": "1",
            "label": "ParentCompanyID",
            "isDefaultValue": false,
            "sortOrder": 0,
            "parentValue": "",
            "isActive": true,
            "isSystem": false
        },
        {
            "value": "2",
            "label": "OwnerResourceID",
            "isDefaultValue": false,
            "sortOrder": 1,
            "parentValue": "",
            "isActive": true,
            "isSystem": false
        },
        {
            "value": "3",
            "label": "TerritoryID",
            "isDefaultValue": false,
            "sortOrder": 2,
            "parentValue": "",
            "isActive": true,
            "isSystem": false
        },
        {
            "value": "4",
            "label": "MarketSegmentID",
            "isDefaultValue": false,
            "sortOrder": 3,
            "parentValue": "",
            "isActive": true,
            "isSystem": false
        },
        {
            "value": "5",
            "label": "CompetitorID",
            "isDefaultValue": false,
            "sortOrder": 4,
            "parentValue": "",
            "isActive": true,
            "isSystem": false
        },
        {
            "value": "6",
            "label": "CompanyNumber",
            "isDefaultValue": false,
            "sortOrder": 5,
            "parentValue": "",
            "isActive": true,
            "isSystem": false
        },
        {
            "value": "7",
            "label": "CompanyName",
            "isDefaultValue": false,
            "sortOrder": 6,
            "parentValue": "",
            "isActive": true,
            "isSystem": false
Make a note of the number shown in the value field of the picklist item for which you'd like to configure callouts. You'll need it for the next step of this process.
Next, add the trigger fields that you want the webhook to use. Triggers are the elements that monitor for a specific event and call the URL associated with the webhook when it occurs. You can configure triggers to take a variety of actions, but in all situations, the following rules apply:
- For create callouts, you must define at least one field (system field or user-defined field), so that the record can generate. You do not have to create all the fields that are required in the UI.
- For update callouts, you must define at least one field (system field or user-defined field) that, when changed, will trigger the callout or will be included in the payload if another field triggered a callout.
- Delete callouts, which apply to the entire entity, do not contain any field values. Returning only the webhook ID value in the webhook is sufficient for these actions.
The payload always includes all base webhook payload fields. For more information about these fields, refer to the Payload Fields section of this article.
For detailed information regarding webhook entity fields, refer to the articles linked in the Additional resources section of this article.
To build a trigger field request, you'll need to construct a POST API call that contains the key pieces of information that you gathered earlier in this process. Your request will need to meet the prerequisites defined in 2b. Add trigger fields, and must also contain the following information:
-
WebhooksEntityName: The name of the webhooks entity to which you sent the webhook creation callout in Create the webhook.
-
WebhookID: The webhook ID that you captured in Record the itemId value.
-
FieldID: The picklist field value you recorded in Identify the picklist field value.
-
Condition1, Condition2: The required webhook field values that every webhook needs to include.
Structure your POST request as follows. Replace all bolded values with the information described in the preceding list. Refer to Example trigger field request for illustrated syntax.
POST URL:
https://webservices[n].autotask.net/atservicesrest/v1.0/WebhooksEntityName/WebhookID/Fields
POST body:
        {
    "FieldID": value,
    "Condition1": true or false,
    "Condition2": true or false,
    "WebhookID": value
}
The following example calls the CompanyWebhooks entity and creates a trigger for the CompanyName field shown in 2a. Retrieve field information.
In the request body, both IsSubscribedField and IsDisplayAlwaysField are true, meaning that the trigger will fire whenever a change to the field takes place, and that the API will add the field to the payload when another field triggers a callout.
Example POST URL:
https://webservices[n].autotask.net/atservicesrest/v1.0/CompanyWebhooks/4/Fields
Example trigger field request body:
        {
    "FieldID": 7,
    "IsDisplayAlwaysField": true,
    "IsSubscribedField": true,
    "WebhookID": 4
}
Successful creation response:
        {
    "itemId": 17
}
If you'd like to create webhooks for user-defined fields (UDFs), the process is largely the same as described in step 2a. Retrieve field information. The main difference is that you'll need to call the corresponding <EntityName>WebhookUdfFields (REST API) or <EntityName>WebhookUdfField (SOAP API) entity to obtain picklist udfFieldID values.
IMPORTANT You must query the UDF webhook fields entity itself, not the parent entity, to determine the field and udfFieldID values available to you. Refer to the following example request for more information.
The following example illustrates possible picklist values available for the CompanyWebhookUdfFields entity. The udfFieldIDs are bolded.
Example GET URL:
https://webservices[n].autotask.net/atservicesrest/v1.0/CompanyWebhookUdfFields/entityInformation/fields
Example field information response (partial):
        {
    "fields": [
        {
            "name": "id",
            "dataType": "long",
            "length": 0,
            "isRequired": true,
            "isReadOnly": true,
            "isQueryable": true,
            "isReference": false,
            "referenceEntityType": "",
            "isPickList": false,
            "picklistValues": null,
            "picklistParentValueField": "",
            "isSupportedWebhookField": false
        },
        {
            "name": "isDisplayAlwaysField",
            "dataType": "boolean",
            "length": 0,
            "isRequired": true,
            "isReadOnly": false,
            "isQueryable": true,
            "isReference": false,
            "referenceEntityType": "",
            "isPickList": false,
            "picklistValues": null,
            "picklistParentValueField": "",
            "isSupportedWebhookField": false
        },
        {
            "name": "isSubscribedField",
            "dataType": "boolean",
            "length": 0,
            "isRequired": true,
            "isReadOnly": false,
            "isQueryable": true,
            "isReference": false,
            "referenceEntityType": "",
            "isPickList": false,
            "picklistValues": null,
            "picklistParentValueField": "",
            "isSupportedWebhookField": false
        },
        {
            "name": "udfFieldID",
            "dataType": "integer",
            "length": 0,
            "isRequired": true,
            "isReadOnly": true,
            "isQueryable": true,
            "isReference": false,
            "referenceEntityType": "",
            "isPickList": true,
            "picklistValues": [
                {
                    "value": "1",
                    "label": "Rioux Company UDF SL-DML",
                    "isDefaultValue": false,
                    "sortOrder": 0,
                    "parentValue": "",
                    "isActive": true,
                    "isSystem": false
                },
                {
                    "value": "2",
                    "label": "Rioux Company UDF ML-DML",
                    "isDefaultValue": false,
                    "sortOrder": 1,
                    "parentValue": "",
                    "isActive": true,
                    "isSystem": false
                },
                {
                    "value": "3",
                    "label": "Rioux Company UDF Text Email-DML",
                    "isDefaultValue": false,
                    "sortOrder": 2,
                    "parentValue": "",
                    "isActive": true,
                    "isSystem": false
                },
                {
                    "value": "4",
                    "label": "Rioux Company UDF Date-DML",
                    "isDefaultValue": false,
                    "sortOrder": 3,
                    "parentValue": "",
                    "isActive": true,
                    "isSystem": false
                },
                {
                    "value": "5",
                    "label": "Rioux Company UDF List-DML",
                    "isDefaultValue": false,
                    "sortOrder": 4,
                    "parentValue": "",
                    "isActive": true,
                    "isSystem": false
                },
                {
                    "value": "6",
                    "label": "Rioux Company UDF Numeric-DML",
                    "isDefaultValue": false,
                    "sortOrder": 5,
                    "parentValue": "",
                    "isActive": true,
                    "isSystem": false
                },
                {
                    "value": "29682851",
                    "label": "Lead Source",
                    "isDefaultValue": false,
                    "sortOrder": 6,
                    "parentValue": "",
                    "isActive": true,
                    "isSystem": false
Make a note of the number shown in the value field of the UDF picklist item for which you'd like to configure callouts. You'll need it for the next step of this process.
Next, add the trigger fields that you want the webhook to use.
You only need to perform this step if you performed the steps in 3a. Retrieve UDF information (optional).
The process is the same as that described 2b. Add trigger fields, except that your POST request will need to call the UdfFields endpoint of the webhooks entity, as shown in the below example:
https://webservices[n].autotask.net/atservicesrest/v1.0/WebhooksEntityName/WebhookID/UdfFields
The following example calls the CompanyWebhooks UDF entity and creates a trigger for the Lead Source field shown in the Retrieve UDF information (optional) section of this article.
In the request body, both IsSubscribedField and IsDisplayAlwaysField are true, meaning that the trigger will fire whenever a change to the field takes place, and that the API will add the field to the payload when another field triggers a callout.
Example POST URL:
https://webservices[n].autotask.net/atservicesrest/v1.0/CompanyWebhooks/5/UdfFields
Example trigger field request body:
        {
    "UdfFieldID": 29682851,
    "IsDisplayAlwaysField": true,
    "IsSubscribedField": true,
    "WebhookID": 5
}
Successful creation response:
        {
    "itemId": 18
}
You can verify that your webhooks were successfully created and are in a ready status by navigating to Left Navigation Menu > Admin > Extensions & Integrations > Other Extensions & Tools > Webhooks in Autotask.

In some situations, you may wish to prevent webhooks from being triggered by certain resources even if all other conditions that generate a callout are met. The most common use case is to ignore changes that an integration has created. The entities that control webhook exclusion are <EntityName>WebhookExcludedResource (SOAP) and <EntityName>WebhookExcludedResources (REST).
EXAMPLE Imagine the following scenario:
You have integrated Autotask with a CRM application that generates new accounts in Autotask. You have also created webhooks that sync any new accounts that a user manually creates in Autotask to the CRM application. To prevent Autotask from creating a duplicate account record in the same CRM application from which it originated, you add the API user identified as the creator resource to the webhook as an excluded resource.
To create an exclusion, you'll need to send a POST request to the ExcludedResource endpoint of the selected webhooks entity. In the body of the request, provide the following information:
-
ResourceID: The Autotask Resource ID of the resource whose actions will not trigger the callout even if all other conditions are met
-
WebhookID: The internal ID assigned to the webhook for which you'd like to create the exclusion
The following example calls the CompanyWebhooks ExcludedResource endpoint and excludes actions by resource 29682894 from triggering the webhook with an ID of "5."
Example POST URL:
https://webservices[n].autotask.net/atservicesrest/v1.0/CompanyWebhooks/5/ExcludedResources
Example trigger field request body:
                {
    "ResourceID": 29682894,
    "WebhookID": 5
}
Successful exclusion response:
                {
    "itemId": 3
}
When the API receives a webhook request, it will contain a payload similar to the following example.
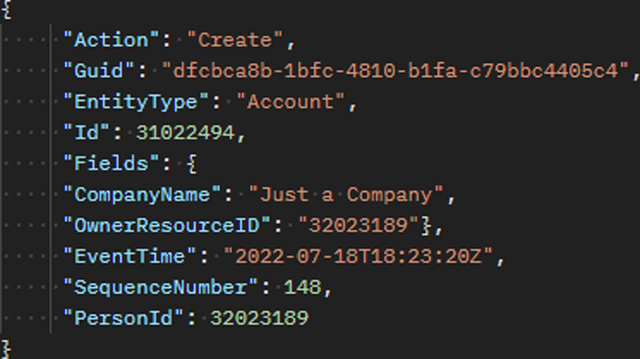
The payload will include the following fields:
Additional resources
Webhook callouts will typically fire less than one minute after a trigger event. When heavy loads occur on the API service, a callout may take up to five minutes to fire. Delays beyond five minutes are a performance problem but not an error. These times do not apply if the webhook callout requests per rolling hour per entity pass 1,500 callouts.
- When this issue happens, additional callouts queue up and but are delayed until you fall below the threshold again. When you configure the webhook, you can opt to receive threshold alerts by setting the SendThresholdExceededNotification attribute to True. Refer to <EntityName>Webhooks (REST API) or <EntityName>Webhook (SOAP API) for more information.
- To ensure that API service performance is excellent for all users, we also limit the number of active webhooks per entity per site to 50. If you are above this threshold, when you try to create an active webhook or update an existing webhook to be active, you will receive an error message.


