Adding or editing a co-managing user
PERMISSIONS Security level with Admin permission to configure Resources/Users (HR). Refer to Admin security settings.
and
PERMISSIONS Security level with Admin permission to configure Service Desk (Tickets). Refer to Admin security settings.
NAVIGATION Left Navigation Menu > Admin > Admin Categories > Features & Settings > Co-managed Help Desk > Co-managed Setup
NAVIGATION Left Navigation Menu > Admin > Admin Categories > Features & Settings > Co-managed Help Desk > Co-managing Users > New Co-managing User
NAVIGATION Contact page > Tools > Enable Co-Managed Access
NAVIGATION Contact Search > context menu > Enable Co-Managed Access
NAVIGATION Left Navigation Menu > Admin > Organization Settings & Users > Resources/Users (HR) > Resources/Users (HR) > License Management > New > Co-managing User
About co-managing users
A co-managing user is a contact at an organization who is taking an active role in solving their technical issues. Most often, a co-managing user is a member of the organization's IT department. A co-managing user is always associated with an organization contact. You can create both the contact and the co-managing user record at the same time.
Adding a co-managing user
BEFORE YOU BEGIN The organization the user will be associated with must have co-management enabled. Refer to Co-managed setup.
NOTE Co-managed licenses are billable licenses.
You add a co-managing user by running the New Co-managing User wizard. You can add co-managing user permissions to an existing contact, or create the contact and the co-managing user at the same time.
- To open the page, use the path(s) in the Security and navigation section above.
- Populate the following fields:
| Field | Description |
|---|---|
|
Organization |
Select the organization the co-managing user will be associated with. All organizations that have co-management enabled are available. In Edit mode, the Organization field is read-only. |
|
Contact |
If the contact record already exists, select it here. To create a new contact for the co-managing user, leave the field blank and click Next. When you edit a co-managing user, to edit the associated contact, click the linked contact name. |
|
General Details and Contact Details |
|
|
General Details |
In this section, you enter the identifying details of the contact you are adding. For detailed field descriptions, refer to Adding and editing contacts. |
|
Contact Details |
Here, you enter the phone numbers and email addresses for the contact. The Primary Email Address is required for the co-managing user record. It should be the co-managing user’s organization email. If the email domain matches a customer domain in CRM, the incoming email parser will recognize the co-managing user as a customer. |
|
Security page |
|
|
Credentials |
Enter the first part of the username for the co-managing user. Up to 32 characters are supported. TIP Your Autotask domain name appears above the field. The full name needed to log into Autotask is username@yourdomain.com. Usernames must be unique. |
|
User Status |
|
|
Security Level |
Select a co-managed security level to control which Autotask features the user can access. Autotask comes with a system security level for co-managing users, and your Autotask administrator can then add customized security levels. For additional information on security levels, refer to Co-managed security levels and Creating or editing a custom security level. |
|
Permissions |
The first check box determines whether a co-managing user will be able to see the Datto RMM links on the Ticket page, Device page, and the Autotask Menu. Refer to Access the Datto RMM alert associated with a ticket. Select the Allow Resource to edit Skills check box to allow the user to maintain his or her Skills profile, including skills, skill levels, education, certifications, and training, and to attach a resume to his or her profile. Refer to Managing certificates, degrees, and skills. |
|
Two-Factor Required Settings |
Since Single Sign-on (SSO) is typically not an option, 2FA is required for all co-managing users. It cannot be disabled, but for a user who has changed or lost their mobile device, you are able to pause it for either the next login or for 24 hours. Refer to Managing two-factor authentication for a resource. NOTE If SSO were implemented, 2FA is simply ignored. |
|
Internal Location |
The Internal Location field (not to be confused with the customer's Organization Location field) associates the co-managing user with one of your (the MSP's) internal locations. This will determine the date, time, and number defaults, country, holiday set, business hours, and the time zone for the co-managing user. |
|
Timesheet |
|
|
Timesheet Start Date |
Since a co-managing users' time entries may be billable, they are able to document their labor in Autotask. Select a start date for the timesheet. NOTE Co-managing users are not required to submit the timesheet. |
|
Timesheet Viewers |
Co-managing users do not have timesheet approvers, but you can specify resources who will be able to view their timesheets. To add a timesheet viewer, click New and select a resource. NOTE Co-managing users cannot track expenses in Autotask. |
|
Associations |
|
|
Line of Business |
Refer to Line of Business. |
|
Departments |
Co-managing users can belong to the MSP's departments as team members, and to departments specifically created for co-management. A separate co-managed department will provide additional filters and search functionality for reporting. |
|
Service Desk Queues |
Co-managing users can be associated with the MSP's queues. They will only see tickets for organizations they are associated with. Co-managing users must be assigned to at least one queue. |
|
Service Desk Roles |
To be able to create a time entry, co-managing users must be assigned at least one role. Best practice is to create a dedicated co-managing role with a billing rate and a block hour multiplier of 0.00. |
|
Skills |
|
|
Skills, Certificates and Training, and Degrees |
Refer to Complete the Skills tab. |
|
Attachments |
|
|
Attachments |
Click New to add an attachment. For general directions, refer to Adding and managing attachments. |
- On any page it appears, you can click Finish Now. The License Confirmation dialog window will appear, informing the creator of additional license fees.
- Click Yes to create the new co-managing user. A confirmation page will appear. You can simply close the window, or select from several other options.
Editing a co-managing user
NAVIGATION In addition to the paths in the Security and navigation section, also here: Left Navigation Menu > CRM > Search > Contacts > click Search > click a contact name > accessory tabs > Co-managed User > Manage Resource Settings
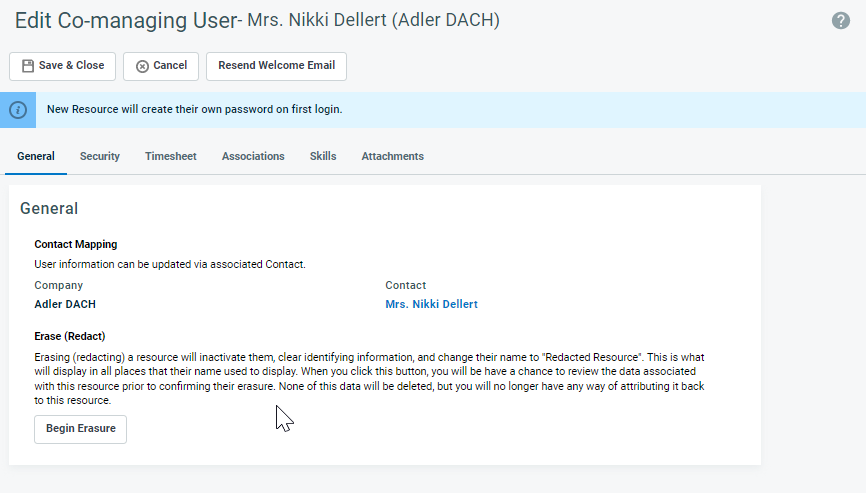
When you edit a co-managing user, the wizard pages are presented as a series of tabs that generally contain the same fields as the wizard. For field descriptions, refer to Adding a co-managing user.
On the General tab, the contact's name is shown as a hyperlink.
-
If you need to change the user's information, you need to edit the associated contact.
-
To erase or redact a co-managing user, click Begin Erasure. Refer to Erasing (redacting) contacts and resources.
Resource management permissions are required.


