Designing an invoice template
PERMISSIONS Security level with Admin permission to configure Finance, Accounting, & Invoicing. Refer to Admin security settings.
PERMISSIONS Security level with Admin permission to configure Contracts & Un-Posting. Refer to Admin security settings.
NAVIGATION Left Navigation Menu > Contracts > Tools / Setup > Invoice Templates > New
NAVIGATION Left Navigation Menu > Admin > Admin Categories > Features & Settings > Finance, Accounting & Invoicing > Invoices > Invoice Templates > New
NAVIGATION Organization page > Invoice Settings > Invoice Template > click ![]()
NAVIGATION Left Navigation Menu > Contracts > Tools / Setup > Invoice Templates > context menu > Design
Invoice templates are created and edited in a WYSIWYG interface that gives you a real-time preview of what the invoice will look like and allows you to navigate to the editor pages for each section. To open the page, use the path(s) in the Security and navigation section above.
TIP Best Practice: Unless you are an experienced HTML programmer, it is much easier to select the template that is closest to the invoice you would like to create and then edit it, than to start from scratch.
The preview page is divided into sections. When you hover over a section, it becomes shaded.
- Click Edit in the shaded section to open the section editor.
- Click OK in the section editor to return to the template preview page and view your changes to that section.
IMPORTANT Changes made in the section editor will not be saved to the actual template until you save the Design Invoice Template page. To save your work as you go along, click Save in the Save & Close menu.
To add, copy, or edit an invoice template, complete the following steps:
- Navigate to Left Navigation Menu > Admin > Admin Categories > Features & Settings > Finance, Accounting & Invoicing > Invoices > Invoice Templates.
- To create a new template from scratch, click New. To copy a template, hover over its context menu and select Copy. The copy is automatically added to the table with Copy (#) preceding the name of the copied template.
- The New Invoice Template page will open. Complete this page and click Save to open the Design Invoice Template page. For more information on completing the New Invoice Template page, refer to Editing invoice template properties.
- To edit an existing template, hover over the context menu of an existing invoice template and select Design. The Design Invoice Template page will open.
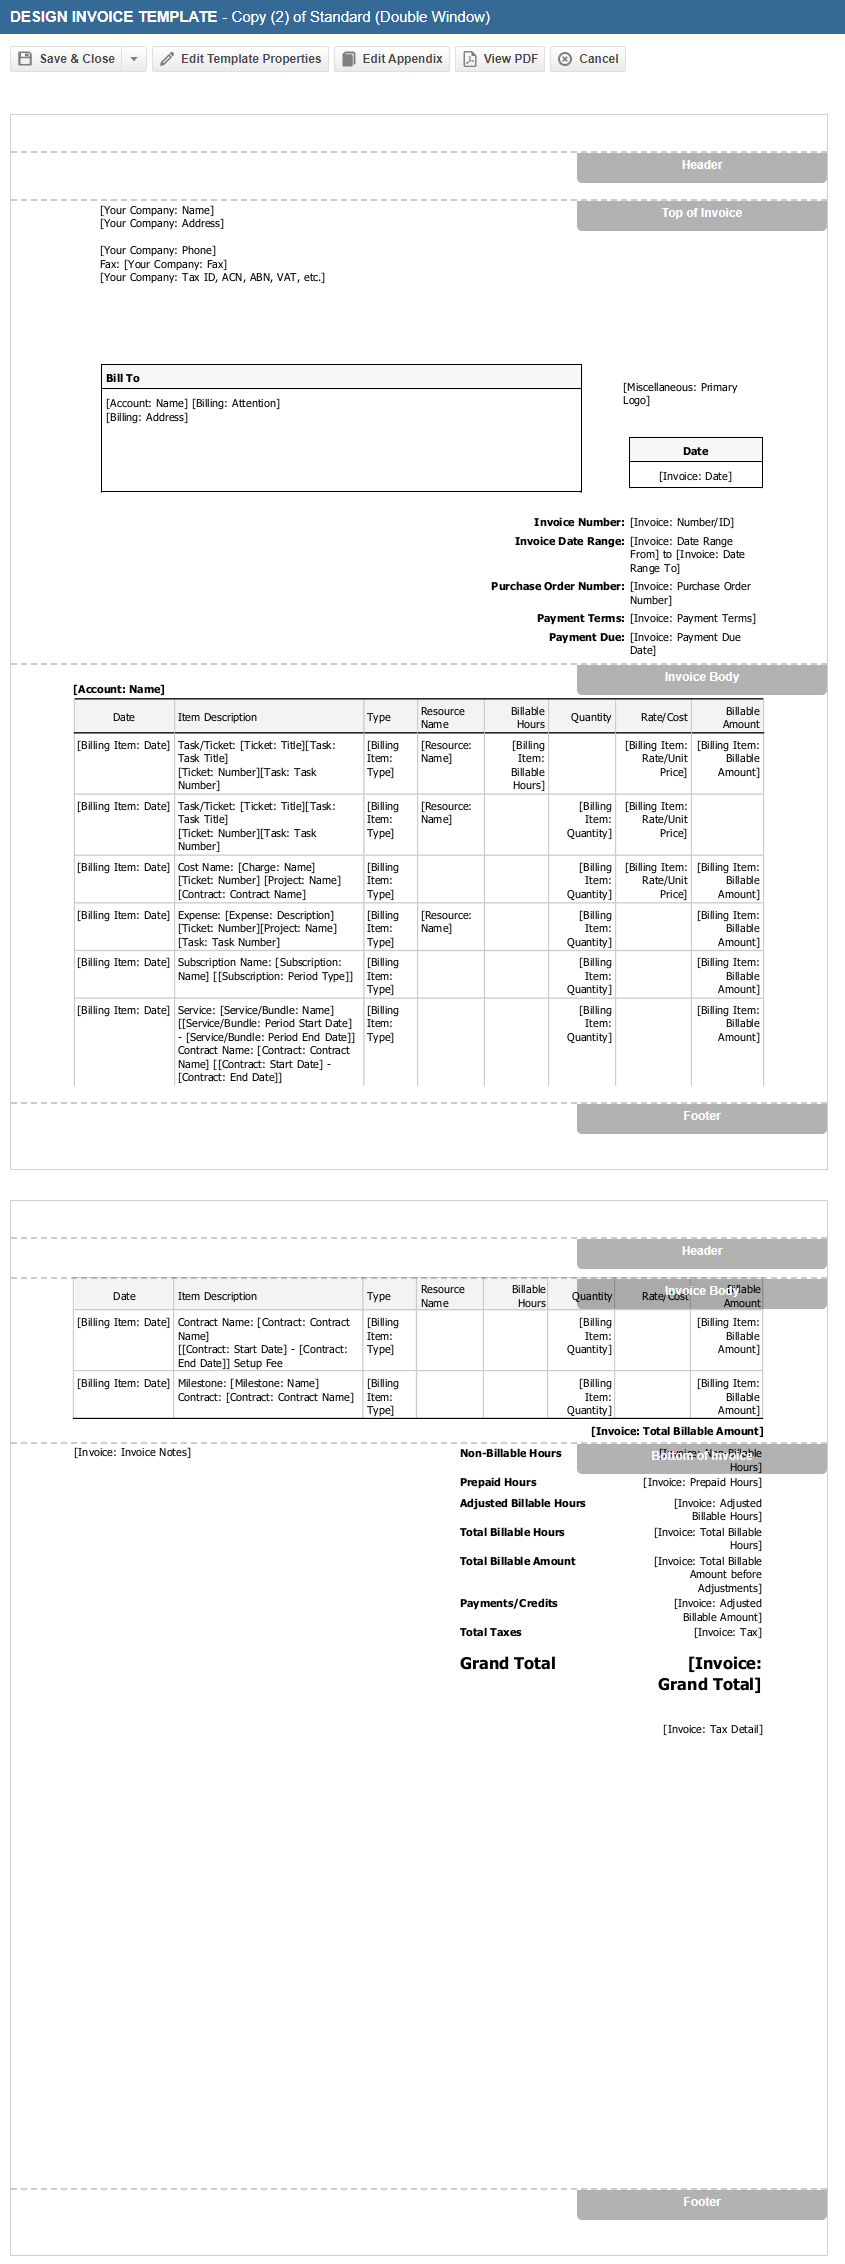
Each invoice template consists of the following sections:
| Section | Description |
|---|---|
| Header | The Header section appears at the top of every page except the Appendix. The maximum vertical height is 300 pixels. If you would like your logo and other information to appear on every page, place it into this section. |
| Top of Invoice | The Top of Invoice section appears once at the top of the first invoice page. Use invoice template variables in this section to display the billing address, invoice number, invoice date and date range, payment terms and any other invoice level information. NOTE The variable data for your own organization comes from your local organization record in Autotask. Refer to Your local organization in Autotask. NOTE To display your local organization's Tax ID, CAN, ABN, VAT or other tax related identifier on the invoice, use the variable Your Company: Tax ID, CAN, ABN, VAT, etc. The value for this variable does not come from your local organization record. It comes from a Contract System Setting. Refer to Tax ID, ACN, ABN, VAT etc. (to display on invoices and quotes). NOTE Invoice numbers are automatically assigned if automatic numbering is enabled under Contracts and billing system settings. If invoices are not numbered automatically, numbers can be assigned when generating a single invoice, but not when using batch invoicing. |
| Invoice Body | This is where you set up the contents and layout of the main part of the invoice—the list of billing items. This section could span multiple pages depending on the number of billing items. For information on editing this page, refer to Configuring the invoice body. |
| Bottom of Invoice | This content will display once, at the bottom of the last page of the invoice, and is recommended for information such as subtotals, credits and adjustments, taxes, and the grand total. This page has additional settings that are described in Bottom of Invoice settings. |
| Footer | The Footer section appears at the bottom of every page except the Appendix. |
| Appendix |
The Appendix will appear at the end of the invoice, starting on a new page. It will not contain the header or footer. On this page, you may want to display your Terms and Conditions. The Appendix does not appear as a section on the Design Invoice Template page. To access the appendix editor, click Edit Appendix at the top of the template page. |
- Hover over a section so it becomes shaded and click Edit. A section editor page will open.
- Use the HTML Editor to place text, labels and variables onto the template. Refer to The HTML editor. For a complete list of available variables, refer to:
TIP When working with the HTML editor, you can apply a condition tag to most invoice template variables so their label displays only when they contain data. Refer to Setting conditional content display for invoice, purchase order, and quote template variables.
- When editing the Top of Invoice or Bottom of Invoice, click Restore Default Content to restore that section of the invoice to the standard "Bill to on Left Side" default content.
For Top of Invoice only, you can click the Restore Default Content down arrow to select which standard template's default content you want to restore: Bill to on Left Side, Bill To on Right Side, or Double Window.
- To return to the Design Invoice Template page, click OK. The template will show a preview of what the invoices will look like, with the variables displayed in brackets and text formatting applied.
- To modify the template properties, click Edit Template Properties on the menu bar.
- To edit the Appendix, click Edit Appendix on the menu bar.
- To see how the invoice would render as a PDF document, click View PDF.
- Click Save to save the template and remain on the Design page, Save & Close to save and close the page, or click Cancel.
IMPORTANT Your changes are not saved until you click Save or Save & Close on the Design Invoice Template page.


